Update Samsung Galaxy S3 I9300 to Android 4.1.1 Jelly Bean BUILD 3 (AOSP) [ unofficial ]

Android 4.1 Jelly Bean was recently announced in the Google I/O 2012 and was distributed to participants and soon after that Galaxy Nexus GT-I9250 received the Jelly Bean update through OTA update. Jelly bean is a latest version of Google's Android OS and successor of Ice Cream Sandwich with improvement in performances and user interface. This Android 4.1.1 Jelly Bean for the Galaxy S3 was release by XDA Developers member Faryaab, so dont forget to thanks him for his contribution. So now the users of Samsung galaxy S3 can try out jelly Bean on their S3 but as it is an unofficial ROM it might contain some bugs, and some features might not function properly, So you can use this Rom only to try Jelly bean on your  Galaxy s3 and not for daily uses, so it is better to wait for the official version to be released if you are not a flashaholic. According to the developer this ROM is built entirely from Google's JellyBean source code and might only get 1-2 more updates as because he is busy with upcoming ROM "SuperNexus" So lets take look on few screen shots of Galaxy S3 running Android 4.1.1 Jelly Bean BUILD 3 (AOSP).

Screen Shots:

Update Samsung Galaxy S3 I9300 to Android 4.1.1 Jelly Bean BUILD 3 (AOSP) [ unofficial ]

Warnings:
This Rom Can be only on Samsung Galaxy S3 I9300 and is not meant for any other device. Use it at your own Risk we will not be held responsible or liability for what ever happens to your device. The information provided here is only for instructional and educational purpose.

Features Included:

  • Fully Deodexed
  • Zipaligned APKs
  • Rooted (Super SU)
  • BusyBox Installed
  • No 3rd Party App
  • ZERO Bloatware
  • Official JB Bootanimation (From Official Galaxy Nexus Android 4.1.1 Factory Image)
  • Init.d Support
What's Working
  • WiFi - BT - NFC
  • HW Composer - Sensors - Audio
  • Data - Calls - SMS - MMS
  • Mostly Everything is Working
Known Issues
  • Wi-Fi tethering is semi-broken 
Requirements
Jelly Bean installation Instructions:
  • Copy Google Apps (gapps-jb-20120724-signed.zip ) and Android 4.1.1 JellyBean - BUILD 3 (AOSP-JB-I9300-BUILD3.zip) file to internal SD Card of your's phone and Switch your phone OFF.
  • Then Boot your phone into ClockworkMod Recovery by pressing and holding the Volume Up+ Home+ Power buttons together.when your phone enters Recovery mode touchscreen will become function less so use the Volume keys to navigate, Home button for making selection and power button for back. 
  • Make a NANDroid backup of your existing ROM.
  • After that Wipe Data/Factory Reset, and Wipe Cache Partition and confirm. 
  • Then return back to the main menu and select Install ZIP From SD Card navigate to internal SD Card of your's phone and select Android 4.1.1 JellyBean - BUILD 3 (AOSP-JB-I9300-BUILD3.zip) file and let the flashing process completed. 
  • After that Flash Google Apps to flash it from the main menu and select Install ZIP From SD Card navigate to internal SD Card of your's phone and select Google Apps ( gapps-jb-20120724-signed.zip ) file and let the flashing process completed. 
  • Reboot your phone by selecting Reboot System Now from the main menu
Congratulations! You have installed Android 4.1.1 Jelly Bean BUILD 3 (AOSP) on your Samsung Galaxy S3 GT-I9300. If you find any bugs post on thread page so that developer can fix it on next update.
Read more ...

Ice Cream Bread - Apocalypse v4.5 ROM for Samsung Galaxy y GT-S5360

Samsung Galaxy y is one of of the most popular low ended android device It is so much popular that every next day we can see some new developed for this phone and this is relay good sign for the owners of Samsung galaxy y. As you know few days back creed's rom 3.5 was released. Today a new version of custom ROM known as Ice Cream Bread - Apocalypse v4.5 is released by the member of XDA known as SethDeCode'z. This rom is based on Pure Stock DXLC1 Firmware. According to the developer this rom is Fast, Stable and Lag-free but still it has some bugs but we can consider it as few drop's of water in ocean means we can use this ROM for daily uses. So before proceeding to our instructional guide on how to install this custom ROM Ice Cream Bread - Apocalypse v4.5 on our galaxy y lets have look on few screen shots of Samsung Galaxy y running on Ice Cream Bread - Apocalypse v4.5 ROM.

Screen Shots:
Ice Cream Bread - Apocalypse v4.5 new rom for galaxy y

Features included in Ice Cream Bread - Apocalypse v4.5:

System Features:

Pre-Rooted/SuperUser
Busybox v1.19.3 Installed,Darktremor Apps2SD v.2.7 Installed,
Zipaligned,
Deodexed,
Init.d Support (Apoc Kernel),
Bash Command Shell,
Nano Support,
Undervolt Support (-110mV Default),
CWM v5 Recovery As Default,Dualboot Support,
Droid Wall Support,CIFS Support,
Swap Support,
4 Frequencis ( 312, 468, 624, 832 ),cm7 Supportext4Support,
sd-Ext Integrated
Bacem Tweak Integrated (110mV As Default)
Display Features:
Gingerbread 14 Status Toggle (Transparent)
I.C.S - Honeycomb Popups
Bounce Animations
Froyo-Honeycomb Lockscreen
Sony Xperia Launcher
I.C.S Nexus Bootanimation
Some ICS,Froyo, and Gingerbread Wallpapers
Sony Bravia HD Engine
MiFile Explorer (Black ICS Themed)
2 Pre-Installed Fonts (Chococooky And ComicBookC)
Froyo Messaging
Gingerbread Dialer
Performance Features:
Init.d Performance Scripts
Lag-Free System
Ram Optimization Tweaks
Build.prop Tweaks
18 Governors Added (Apoc Kernel), 5 IO Sched
conservative
smoothass
smartassV2
hotplug
minmax
Scary
SavagedZen
lazy
interactiveX
brazillianwax
interactive
ondemand
powersave
bcm21553
Lionheart
          Performance AND Some More Governors... 

Network Features:
*LA1/*LC1 CSC (Set As GLB Default CSC)
Network TCP Tweaks
Other Features:
Google Maps W/ Worldwide Navigation Activated
Google Play Music 4
Beats Audio Images (bass_iBeats,dynamic_iBeats) Compatible For Beats Solo
DSP Manager 2.3.6/2.3.6

Warnings:
This custom Rom Can only be installed on Samsung galaxy y model gt-s5360 and is not meant for any other model. Use it at your own Risk we will not be held responsible for what ever happens to your phone. The information provided here is only for instructional and educational purpose.

Rom Details :

  • Device Name : Samsung galaxy y model gt-s5360 
  • Release Name : IceCreamBread-Apocalypse_v.4.5.zip 
  • Size : 115.89 MB 
  • Download Link (not mirrored) : IceCreamBread-Apocalypse_v.4.5 link or from the original thread page.


Instructional guide to install this rom:
  • Back up your system and charge yours phone battery at least 75%
  • As you have already downloaded the Rom file "IceCreamBread-Apocalypse_v.4.5.zip" from the link provided above place it in the root directory of yours phone SD card and not inside any folder and turn your phone off.
  • Now you have to boot your phone in Recovery Mode to boot in Recovery Mode press and hold Volume Up + Home Key + Power button together until you see blue screen.
  • On entering Recovery Mode your's phone touch screen will become function less you will have to take help of keys to move up and down use volume key for selection home key and for back use power button.
  • Now first of all Wipe Data And Cache
  • Then Select "Apply Update From Zip" and navigate to root directory and select the ROM file which is "IceCreamBread-Apocalypse_v.4.5.zip" The patching process will begin let the process to complete it do not interrupt. 
  • After the patching process completd select "Reboot System Now" from menu first boot may take a bit longer then normal boot so keep passions. In case if you stuck at boot logo Wiping Data And Cache will solve it.

Congratulation now enjoy the new ROM on your young.
Read more ...

Custom ROM for samsung galaxy y duos GT-S6102 TechnoDUOS V1.0

Samsung galaxy y one of the most popular smartphone and now its upgraded model is available with option to use two Sim known as samsung galaxy y duos GT-S6102(dual Sim).We have posted instructional guide on how to install custom rom on galaxy y GT-S5360 like Creed's Rom 3.5, Ultimate Super Sonic ROM v4etc. For rooting galaxy y duos GT-S6102 an instructional guide is here. This time we will provide you with an instructional guide on how to install custom ROM on galaxy y duos .This ROM is developed by Recognized Contributor of XDA Millan.SIS So don't forget to thanks for his hard work.it is a nice looking ROM. Nightly build version of this this custom ROM TechnoDUOS V 1.5 BDSky is also available TechnoDUOS1.5 (Nightly 1502) (Rom) which i will cover in my next post. So before proceeding lets take look on few screen shots of samsung galaxy y duos running on custom rom known as TechnoDUOS 1.0.


Screen shots v 1.0:

Warnings: 
This custom Rom TechnoDUOS v1.0 is only for samsung galaxy y duos model GT-S6102 and is not meant for any other device. Use it at your own Risk we will not be held responsible for what ever happens to your device. The information provided here is only for instructional and educational purpose.

Features Included:
  • Fully Deodexed
  • Zip-aligned
  • Busy-box + Run-Parts
  • Pre-Rooted
  • Custom Boot animation Support
  • Bash Command Shell
  • init.d Scripts Support
  • a2sd or Apps2sd support
  • Blue Themed
  • Bravia Engine Port
  • Dsp Manager
  • Modified Stock Music Player
  • Bloatwares Removed
Requirements:
  • A samsung galaxy y duos GT-S6102 running on latest version of gingerbread.
  • Rom file TechnoDUOS1.0.zip  get it from HERE
  • Clockwork MOD for galaxy y Duos get it from HERE
Installation instructions:
  • First of all backup your System using Clockwork MOD
  • Then Place the downloaded file in root directory of SD card and not inside any folder and turn your phone off.
  • Now your phone must be booted in recovery mode to boot in recovery mode press and hold Volume Up + Home Button + Power Button.all together. when your phone enters recovery mode it will have Blue Color User Interface and your touch screen will become function less so you will have to take help of keys use Volume Up and Volume Down key to move Up and Down and Home Button for making Selection and Power Button used to go Back.
  • Then from the menu select "Apply Update from SDCard" and navigate to root directory choose Downloaded Clockwork MOD the file is "CWM-try1.zip" for galaxy y duos, Now you enter into CWM successfully you should Wipe Data and Cache to make this Custom ROM Work Properly.
  • when Wiping Data and Cache is over you have to select "Select ZIP from SDCard" from the option and navigate to root directory and select the custom ROM TechnoDUOS 1.0 which is "TechnoDUOS1.0.zip" and5 the process will begin let the process complete. 
  • When the patching is completed Reboot your Phone by selecting5 "Reboot System Now". 
  • First boot may take a bit longer time the normal so keep passions.
Congratulation! now you have custom Rom TechnoDUOS v 1.0 on your galaxy y duos GT-S6102 you can also update it to TechnoDUOS v1.1 (UpdatePack) if you have noticed any bug then you can go to the original thread page and provide details so that developer will fix it when he lunches new version.

Read more ...

Root Samsung Galaxy Y Pro Duos GT-B5512

One of the most popular and low budget Android from samsung is Samaung galaxy young .In our previous instructional guide we have guided you on how to root samsung galaxy y GT-S5360 and how to Root and Unroot samsung galaxy y duos S6102. both of this are touch phones The Galaxy young series also have its pro model know as Galaxy y pro which is the touch and type model running on Android Gingerbread. So here we are going to provide you an instructional guide how to Root Samsung Galaxy Y Pro Duos GT-B5512 (Dual SIM). So in simple words Rooting Android Device means to Gain Superuser Right to know more what rooting is read here This Root file is created by Senior member of Xda abbas so don't forget to thanks him. So if you want to take full advantage of your device you can root your device and gain superuser right decision is yours.
Root Samsung Galaxy Y Pro Duos GT-B5512
Warning:
Use this instruction only with Samsung Galaxy Y Pro Duos GT-B5512. Rooting will void your device Warranty. Use at your own risk we will not be held responsible for whatever happen to your phone. It is provided only for instructional and educational purposes.

Requirements:

  • Samsung Galaxy Y Pro Duos GT-B5512 running on Android Gingerbread. 
  • Rooting file " update.zip " Download from here

Rooting Instructions:
  • First of all you will have to Download "Update.zip" file from the link provided above in the Requirement Section of this post and place in the root directory of the SD Card after placing the "update.zip file in the root directory of Sd Card turn your phone OFF. 
  • Now you will have to reboot your phone in Recovery mode to enter recovery mode press and hold volume up + home + power button together on entering recovery mode touch screen will become function less so use volume up and down key to move up and down, home key for making selection and power button for back. 
  • Now select the option saying update from sd card and navigate to the location where you placed the ROM file "update.zip " and select it. 
  • It will take few minutes to complete the process when it is completed reboot your phone. 
  • In the apps drawer you will find a new app called Superuser it means that your phone has been rooted. 

Congratulation! your Galaxy y pro Duos B5512 has been rooted And you have achieved superusers right on your phone.
Read more ...

Root Samsung Galaxy S2 GT-I9100 running Android 4.0.4 ICS build XXLQ5

The first Android 4.0.4 Ice Cream Sandwich firmware build XXLQ5 was leaked online few days ago for Samsung Galaxy S2 GT-I9100 and we posted an instructional guide on how to flash Android 4.0.4 ICS build XXLQ5 on Samsung Galaxy S2 GT-I9100. This update leads to improvement in performances and smoothness then previous version. So to gain more out of this we must gain superuser right by rooting the device running on build XXLQ5. Now which is possible because XDA Elite Recognized Developer Chainfire who has developed and released the CF-kernel for the build XXLQ5 which can be easily flashed with the help of Odin to root Samsung Galaxy S2 GT-I9100 running on Android 4.0.4 build XXLQ5, it also install's Clockwork Mod recovery.


Warning
This instructional guide must be only used with Samsung Galaxy S2,GT-I9100 running on build XXLQ5 don't use with other devices.Use these instructions at your own risk we will not be held responsible for whatever happen to your phone. It is provided only for instructional and educational purposes.

Requirements
  • Samsung Galaxy S2 GT-I9100 running on Android 4.0.4 ICS build XXLQ5 firmware
  • Backup all your important data from your phone.
  • Enable USB debugging on your Galaxy S2 
  • A computer running on windows and loaded with proper required driver. You can get this driver if you have kies cd that is provided with your device else you can download it from device manufacturar site or from here 32-bit (x86) Windows | 64-bit (x64) Windows and install it before proceeding.
  • You will need Odin3 v1.85 (Odin3-v1.85.zip) and CF-Root Kernel ( CF-Root-SGS2_XX_OXA_LQ5-v5.6-CWM5.zip ) download it on your computer and keep it safe.

Instructions to root the Galaxy S2

  • As you have already Downloaded Odin and CF-Root Kernel from the above link now you need to extract it using a file manager like winrar or winzip. when you will extract CF-Root Kernel you will get "CF-Root-SGS2_XX_OXA_LQ5-v5.5-CWM5.tar" file and on extracting Odin3-v1.85.zip you will have Odin3 v.1.85.exe.
  • Turn your phone off and reboot it in download mode to enter download mode press an hold Volume Down key, Home button, and Power button together and when “Warning!” screen appears, press the Volume Up key to enter Download Mode.
  • Now lunch Odin3 v1.85.exe on computer by double clicking on it . when the odin gets lunched click on the PDA button and navigate to the folder where you have extracted CF-Root Kernel and select the CF-Root-SGS2_XX_OXA_LQ5-v5.5-CWM5.tar file. Let rest of the setting default on Odin 
  • Now connect your galaxy S2 to computer via USB cable once it get conned you will see a message“Added!” in Odin’s lower left screen.If n try to re-install the driver and try again.
  • If your device is connected successfully and you received the “Added!” message click on START button in Odin to flash the CF-Root Kernel.
  • When the flashing is completed your device will reboot automatically. In case if it gets stuck repeat the process above again.

Congratulations! now you have Rooted Samsung Galaxy S2 GT-I9100 running Android 4.0.4 ICS build XXLQ5.
Read more ...

Android 4.0.4 ICS build XXLQ5 for Samsung Galaxy S2 GT-I9100

As we know that recently jelly bean has been lunched by Google but here we are talking about Samsung Galaxy S2 GT-I9100 so the latest version that you can install on this device is Android 4.0.4 ICS build XXLQ5. As this is not an official version so it still carries a few bugs which can be considered as negligible, so we can say that this firmware is smooth and stable for daily uses. So if you are interested in upgrading your Samsung Galaxy S2 to Android 4.0.4 ICS build XXLQ5 to achieve faster, smother version of latest android OS on your galaxy SII and experience the new UI and features then follow the instructional guide provided below:


Warning:

This instruction guide is only for Samsung Galaxy S2, model number GT-I9100 and not to be used with other devices. Use it at your own risk we will not be held responsible for whatever happen to your phone.It is provided only for instructional and educational purposes.


Requirements:

The first requirement will be Samsung Galaxy S II GT I9100
A computer running windows with all required drivers (installing Samsung Kies will do this for you) and a USB cable.
Next you will require file manager like winrar, winzip for extracting the files.
Next you will need Odin3 1.85 download it

Rom Details :


Installation Instructions:

  • Backup of your Device and charge your phone’s battery up to 75% . .
  • Download the Odin and ROM file " I9100XXLQ5_I9100OXALQ5_OXA.zip " from the link provided above to your computer and place it in a folder.
  • Next you have to extract I9100XXLQ5_I9100OXALQ5_OXA.zip file that you downloaded with help of file manager and when extraction will complete you will receive four files as namely:
  1. I9100_CODE_I9100XXLQ5_CL753921_REV02_user_low_ship.tar.md5
  2. GT-I9100-MULTI-CSC-OXALQ5.tar.md5
  3. MODEM_I9100XXLQ5_REV_02_CL1165929.tar.md5
  4. u1_02_20120326_emmc_EXT4_8GB.pit
  • Next extract the Odin 1.85.zip file you will obtain Odin3 v1.85.exe file. Lunch Odin3 v1.85.exe on your Computer by double clicking it.
  • Next enable the USB Debugging on your phone by tapping on Menu >>Settings >> Applications >> Development >> tick the USB debugging. 
  • Next unplug your phone if it is connected to computer and turn it OFF.
  • Next is to turn your phone ON in Download mode, to enter download mode press and hold Volume Down Key, Center button, and Power Button together.
  • When you have entered download mode connect your phone to computer via USB cable If in Odin, a message saying “Added!!” appears on the bottom left of the window means your phone is connected successfully.
  • Next step is to select the proper file in Odin to do this :
  1. Click on the PDA button in Odin and navigate to the folder where you extracted the Rom File and select "I9100_CODE_I9100XXLQ5_CL753921_REV02_user_low_ship.tar.md5" file.
  2. Click on the PHONE button and select "MODEM_I9100XXLQ5_REV_02_CL1165929.tar.md5" file.
  3. Click on the CSC button and select "GT-I9100-MULTI-CSC-OXALQ5.tar.md5" file.
  • Leave ever thing else as default and click on start button in Odin to start flashing the firmware of your Galaxy S2 GT-I9100. After the process get completed successfully your phone will get rebooted automatically. In case if it fails repeat the process above under Installation Instructions section.

Congratulation! your phone is now updated to latest version of Android 4.0.4 Ice Cream Sandwich build XXLQ5. you can check the firmware version of your phone by tapping on Menu >> Settings >> About Phone and scroll down to see the firmware version it will be XXLQ5.

Read more ...

Ultimate Super Sonic ROM v4 (u.s.s.r v4) for Samsung Galaxy Y GT-S5360 with jelly bean look

Hi as we know that a new version of android OS Jelly bean has been announced by Google. So a senior member of xda evanlocked has created a rom known as ultimate super sonic rom v4 based on version "DXLE1" which helps to achieve the look and fell of Android jelly bean on samsung galaxy y s5360.This is a custom Rom based on version DXLE1 of gingerbread but it has been modified so it looks almost like jelly bean. So for those who wants to have jelly bean look on their galaxy young can try this custom ROM. So thanks to the developer for providing this ROM for galaxy y. So before proceeding lets have look on few screen shot of galaxy y running on ultimate super sonic ROM v4 with jelly bean look.

Screen Shots:
ultimate super sonic rom v4 for samsung galaxy y with jelly bean look

Warnings: 

This Rom Can be only on Samsung galaxy y model gt-s5360 and is not meant for any other device. Use it at your own Risk i will not be held responsible for what ever happens to your device. The information provided here is only for instructional and educational purpose.

Features Included:
  • DEODEXED
  • DXLE1
  • JELLY BEANS TASTE INSIDE
  • 9 LOCKSCREEN ALL PORT FROM SGS
  • NEW SETTINGS.APK
  • SWIPE TO REMOVE
  • CUSTOM CLEAR BUTTON
  • EDT TWEAK ADDED
  • LIDROID PARTS
  • TRANSPARENT MMS.APK
  • JELLY BEANS ICON PACK
  • JELLY BEANS WALLPAPER CHOOSSER
Requirements:
A Samsung galaxy y  running on latest version of gingerbread.
Rom file USSR V4.ZIP

Installation instructions:
  • First of all backup your necessary data. It it better if you are on latest stock ROM but it is optional
  • Place the downloaded file in root directory of SD card.Then enter cwm recovery after you enter recovery mode choose data wipe and cache.
  • Then from the menu select install zip from SD card and choose the file ussrv4.zip that you placed in root directory of SD card an the process will begin let the process complete. 
  • Don't reboot your device and select advanced then reboot recovery
  • Do data wipe and cache in stock recovery now reboot your system.
  • First boot may take a bit longer time the normal so keep passions

Congratulation now you have jelly bean on your galaxy y if you have noticed any bug then you can go to the thread page and provide details so that developer will fix it when he lunches new version. 
Read more ...

How to remove Jailbreak on iPhone. iPod touch or iPad

As we have already written instructional guides related to Tethered and Untethered jailbreak on many iOS runing devices so this time i have thought it will be better to post an instructional guide on how to remove jailbreak or restore your i-devices back to factory settings on your iPhone. iPod touch or iPad. Why does it become necessary to restore back your jailbroken iDevices. Suppose you jailbreak your iPhone. iPad or iPod touch and the device become unstable and apps began to crash so now the only option you have is to restore your iPhone. iPad or iPod touch back to factory setting by remove jailbreak. So now you will have to follow the instructions below to unjailbreak or restore back your device to factory setting.

Requirements for removing Jailbreak:

  • A jailbroken iPhone or iPad or iPod touch running on iOS.
  • A computer Running Windows or mac loaded With required Driver for your Device and latest version of iTunes installed on your PC or Mac.


Steps to remove the jailbreak on your iPhone, iPod Touch or iPad 
  • Now on pc or Mac open iTunes.

  • Connect your iPhone, iPod Touch or iPad via  USB cable to your PC or MAC.
  • Now when your device get connected you are promoted for automatic backup you can either cancel the automatic backup or let it complete.
  • After that click on your Device in the left column of iTunes as shown in the image below.

  • Now from the summary tab of your device click on Restore button, If you have cancelled automatic backup in previous step then back up your device now.
  • After the restoring process will start and your device will be restored back to factory setting and the jailbreak will be removed.
  • After your device get restored you can re install the backup that you created.


That's all .....

Read more ...

New iPad from Apple will be available in china from Friday, July 20

New iPad from Apple will be available for sale in china from Friday, July 20 as announced by Apple on Tuesday July 10, the New iPad was introduced on March 7, 2012 by Apple but due to dispute over iPad trademark rights it was not available in China but now as the dispute has been settled with Proview Technology it will be available in China from Apple store, Apple online store, and Authorized Resellers. For those who want New iPad from Apple store will have to make reservation begins from July 19th time 9A.M. in the morning to 12 P.M. daily only three hours for reservation and those who successfully register their New iPad will be able to collect the their new iPad next Day. The New iPad will be available in both white and black Color and the price remains equivalent to the the selling price in US depending on specifications.

 The New iPad equipped with Retina Display the screen size is 9.7-inch and have 5 mp camera. Depending on the specification option for cellular connectivity are also available.

  So after a long court battle Apple pays $60 million to settle iPad dispute and now it after a weeks of settlement the announcement is made by apple to lunch its New iPad in china.
Read more ...

Samsung Galaxy Note 2 with 5.5" screen, Jelly Bean and 13MP camera to be debut at IFA 2012

As we know that Samsung has recently released the successor of its most popular Galaxy S series known as samsung Galaxy SIII. So now there has been rumor that the successor of Galaxy Note which will be galaxy note 2 may be soon official announced by Samsung. According to a report of Korean news agency MK News publication Samsung is going to debut its Galaxy Note 2 at the upcoming IFA a consumer electronics Trade show which starts in August 2012 in Berlin, Germany.
 According to them a source close to the development team said that the successor of Galaxy Note will have larger screen size that is 5.5 inches instead of 5.3 inches of galaxy note. This is not all just more features may be included Just continue


 Above this galaxy Note 2 will be equipped with quad-core processor which will increase the processing speed for better performance and will be helpful while multi-tasking it will be loaded with the latest Android Operating System form Google known Jellybean v4.1. Accordingly unbreakable plane (UBP) display technology may not be included in Galaxy note 2 and we may see this technology in some other next upgraded models. One of the most important features that we cannot forget is about it's camera resolution “There are also talks of improving the camera resolution to 12.0 or 13.0 megapixels, up from current 8.0 megapixels, but this may be changed depending on other factors."

 So now we have to just wait for IFA 2012 trade show where we can expect that Samsung might unveil Galaxy Note II. A lot can happen between this Days so we did expect even more reports related to Galaxy note 2 before it arrives to IFA 2012.
Read more ...

What is CYDIA?

If you are an Apple iPhone, iPod touch or iPad user then you are already acquainted with this name CYDIA and what are its uses but for those who are not Familiar with this name let me tell you it is a third party application installer for your jailbroken iphone, ipod touch and iPad and it's almost similar to Apple’s app store. Jay Freeman (Saurik) is the developer of this application which open the door to install tons of apps, utilities and tweaks on idevices which are not possible with Apple App Store. So if you jailbreak your device with help of jail breaking tool it will install cydia. So what is the use of cydia? To over come this Question i will try to explain it with simple example.

You would have probably seen guys with smartphone other then from Apple use to change their themes and customize their phones to achieve different look and UI, but if you are an iDevice owner and have never jailbroken your phone and installed Cydia then it is not possible to install theme or other apps which are not approved by app store on your iDevice because Apple dose't provide this ability, But if you have jailbroken iPhone and installed Cydia then it is possible to install theme on your idevice simply from Cydia install Winterboard and it will allow you to install themes on your idevices. Some usefull applications such as BTstack Keyboard which allow us to use Bluetooth keyboard to interact with idevices, Wi-Fi sync enable syncing with iTunes in wireless mode no need of USB cable.
So now we can say that cydia allow us to install an applications and customizing tweaks which are developed by developers and programmers which are not available or approved in app store.
So now you can enjoy lots of apps and tweaks on your iPhone, iPad and iPod touch.
Read more ...

Update HTC One X to Android 4.1 Jelly Bean [ Unofficially ] ROM

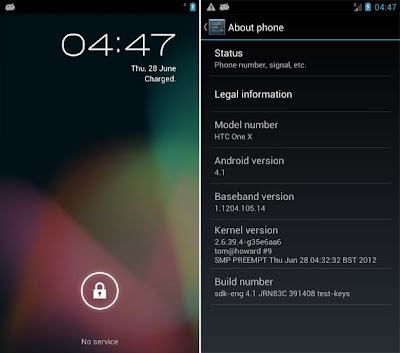
In the last week of June a new version of android has been announced know as Android 4.1 Jelly Bean at Google I/O 2012 conference and was distributed to participants. Initially this version of android will be the stock version on the new batches of the galaxy Nexus phones and tablets.Devices from other manufacturers may receive this update much latter. but here is a good news for HTC One X owners who are interested in checking out the new features of Jelly Bean’s on their HTC One X. This port of Android 4.1 Jelly Bean for the One X was release by senior member of xda tgascoigne as this rom was released by the developer very Quickly say within few days after the distribution of preloaded jelly bean nexus devices at Google I/O 2012 conference so because of short development period and lack of resources this rom can not be considered as a stable rom but according to dev. " probably expect to see some kind of Alpha release fairly soon." so you can expect a stable version of this rom for HTC X One from the developer soon.
Update HTC One X to Android 4.1 Jelly Bean [ Unofficially ] ROM
   As for now Core system is working well with little to no crashes the things that do not work are Camera, Wi-Fi, radio, Audio, and probably many more so at present we cannot consider this Rom is Suitable for Daily uses. So we can say that this ROM is meant only for flashaholic, so if you are a daily user it is better to wait for HTC’s official update for the One X to Jelly Bean which will probably come in few months. Note:So we do not recommend you to flash this ROM on your HTC one X unless you are fully prepared and have sound knowledge to do so. so it at your own risk.

Screen Shots:

HTC One X to Android 4.1 Jelly Bean screen shot

 So if you are addicted to Flashing new rom and interested to check out Jelly Bean on your HTC One X. Then you can get full details on how to install this ROM and the Download link on the official thread of XDA

This release of android adds few important features like Project Butter for a much smoother user interface and many more other minor updates. 


you amt also like :


Read more ...

Untethered Jailbreak iPhone 4 and iPhone 3GS running on iOS 5.1.1 [Windows]

In our previous post we have provided you with an instructional guide on how to tethered Jailbreak iPhone 4 and iPhone 3GS running on iOS 5.1.1 using Redsnow. So now here i am going to show you how to Untethered Jailbreak iPhone 4 and iPhone 3GS running on iOS 5.1.1. The main advantage of Untethered in compare to tethered jailbreak is you do not have to patch the kernel by connecting to computer every time your phone losses power.To do Untethered jailbreak on idevices here we are using Absinthe 2.0.4 jailbreak developed by Chronic Dev-Team. here in this instructional guide i am going to use windows version of Absinthe jailbreak tool but it is also available forlinux and mac. this jailbreaking tool can be used for untethered jailbreak on most of the iOS 5.1.1 running Devices like iPhone 4S, iPad 3, iPad 2, iPhone 3GS, iPad, iPhone 4, iPod touch 4G and iPod touch 3G.. If you are an iPhone 4 or iPhone 3GS user and have a computer running on windows , you can follow the instructions provided below to untethered jailbreak iPhone 4 or iPhone 3GS running on iOS 5.1.1.

Warnings:
Jailbreaking your Device voids Manufacturer warranty
This guide can only be used on iPhone 4 or iPhone 3GS running on IOS 5.1.1 donnot use this on devices running on other version of iOS. Use this at your own Risk we will not be held responsible for what ever happens to your device.

Requirements for Untethered jailbreaking:
  • First of all you need is iphone 4 or iphone 3GS running on Apple's iOS 5.1.1
  • A computer runing on windows XP/ Windows 7.
  • Absinthe 2.0.4 for Windows Download from Here.
Instructions to Untethered Jailbreak:
  • Backup your device before going to next step mandatory.
  • Download Absinthe 2.0.4 for Windows from the link provided in requirement section and place it in a folder now extract absinthe-win-2.0.1.zip using winrar or winzip or any file manager that you have. upon extraction over you will get absinthe-win-2.0.4.exe file.
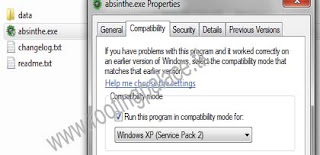
  • Now double click the absinthe-win-2.0.4.exe file which you get after first extraction it will create a new folder called absinthe-win-2.0.4 inside the folder you will find absinthe.exe file.If you are on Windows seven you will have to change the compatibility of the program "absinthe.exe" to "Windows Xp (service pack 2), to change the compatibility of the program right click on program ans select properties from context menu on properties screen click on compatibility tab and check the box saying "Run this program in compatibility mode for" and from Drop Down menu select Windows Xp (service pack 2) see the image below:

change the compatibility of the program "absinthe.exe"
  • Now if you are on win 7 then after changing the compatibility of the program launch absinthe.exe with Adminstrator rights.
  • When Absinthe-version 2.0.4 is lunched , connect your iPhone 4 or iPhone 3GS to the computer via usb cable and click the “Jailbreak” button.

  • Now Absinthe 2.0.4 will begin to jailbreak your iPhone 4 or iPhone 3GS and also shows different stages on untethered 5.1.1 jailbreak it may take long time depending on the volume of data you have stored on your iDevice waiting for process to complete reboot and done.
Congratulation now you have untethered jailbroken iPhone 4 or iPhone 3GS running on iOS 5.1.1 along with Cydia. 
Read more ...

What does Jailbreak on iOS device means? Difference between Tethered and Untethered Jailbreak

What is jailbreak on iOS Devices? So before understanding what the term jailbreak means lets take a brief look on what is iOS. iOS is an operating system that was developed by Apple Inc. for the mobile devices Primary when it was released it was only for iPhone and iPod Touch as the time escaped it begin to support more idevices like Apple TV and iPad's. So in simple terms firmware that runs on iDevices is known as iOS. Now lets move to our main topic Jailbreak. From the name jailbreak itself we understand that breaking something out of jail the word somethings here refers to iDevices. So in technical terms jailbreak on iOS running devices means removing the limitation to gain full access on the Unix File-System. This limitation are imposed so that the users cannot mess in the protected area of the file system. So to remove this barrier we have to jail break this devices. So your Question will be what are benefits of jailbreaking? When we jailbreak our iPhone, etc. a new application (i.e. app store) gets installed known as Cydia which allow us to install third party software that are meant only for jailbroken iOS devices. Through this app you can get lots of standalone applications, it also small tweks or extensions that are use to customize your Apple's ios and apps developed by various developers and programmers which are not possible to installe with Apps Store app. So we can say that first use of jailbreaking is to add extra features and customize our ios device. jailbreaking also helps to unlock iOS devices to use on multiple carriers. Drawback of Jailbreaking your device is that it increases risk of installing malicious software's.
What does Jailbreak on iOS device means? Difference between Tethered and Untethered Jailbreak

Warnings:
Jailbreaking your iOS device void Manufacturer warranty

Types of Jailbreaking:
There are two types of jailbreak know as Tethered Jailbreak and Untethered Jailbreak now lets look what is the main difference between this two types of jailbreak.


Tethered Jailbreak
Means that every time you phone reboot, restart or your phone losses power it will loose the patched kernel an the jailbreak will become function-less to to regain the full functionality and jail-broken state you will have to reconnect your device too computer and run the tool which was used while jail breaking your iphone and have to use "just boot" or "boot as tethered" option on your jailbreack tool which will again patch the kernel temporarily until next reboot or boot.

Untethered Jailbreak
Simply it is just opposite to Tethered Jailbreak here the kernel is patched permanently so you don't have to connect your device every time to computer on power loss or reboot or even after hard reset. so it can be considered as ideal solution
Read more ...

Jailbreak iPhone 4 or iPhone 3GS running on iOS 6.0 Beta 2 With RedSn0w 0.9.13dev2

Recently Apple has pushed iSO 6.0 beta 2 to the Developers over the air(OTA) and if you have updated to this version of beta Firmware on your iPhone 4 or iPhone 3GS then now it is possible to tethered jailbreak your iPhone with the help of latest release of RedSn0w 0.9.13dev2 it is released by iPhone Dev-Team for both Mac and Windows. Here in this guide we are using Windows version to do tethered jailbreak. If your iPhone is on an untethered jailbreak running any previous version of iOS updating to this latest beta version of iOS 6.0 Beta 2 will not be a wise step it is better to wait for the final release but the choice is yours because tech crazy people like us always want to be one step ahead. So if you want to have this version before it hit the mass you can do so. So now lets move to our main point how to tethered jailbreak your iDevices running on iOS 6.0 beta 2. So follow the instructions provided below:

Warnings:
This is just an instructional guide for educational purpose. Use this at your own risk you cannot held us responsible for what ever happens to your device. Once you tethered jailbreak your iDevice you will require computer every time your phone loses power to regain Jailbroken and full functional state.

Requirements for jailbreaking: 
  • As state above here in this instruction we are using windows version of RedSn0w to jailbreak iPhone.
  • The first requirment will be an iphone 4 or iphone 3GS running on iOS 6.0 beta 2 if not updated get it from iOS Dev Center website or through OTA
  • A computer runing on windows XP / 7.
  • RedSn0w 0.9.13dev2 (Windows) Download from Here
Instructions to jailbreak:
  • When download is completed extract the downloaded file "redsn0w_win_0.9.13dev2.zip" using any file manager like winrar, winzip or any one that you have to any folder or on desktop depends on your choice.
  • A new folder will be created say "redsn0w_win_0.9.13dev2" now open that folder and launch RedSn0w.exe
  • When RedSn0w is lunched click on "EXTRAS" button it will take you to next screen there you will have to click on "Select IPSW" and navigate to the location where you have extracted the RedSnow and choose iOS 6.0 Beta 1 IPSW file (remember beta1 not beta 2)  after selection click on back button.
  • Now when you are back to home screen of RedSn0w Click on Jailbreak button to start the process of jailbreaking your Device.
  • Now you will get an new screen where you will have to select ‘Install SHSH’ from the available options and click on next to proceed
  • Now you need to put your iPhone 4 or iPhone 3GS in DFU mode. Also make sure that your iPhone is both off and plugged in to the computer.
  • Hold down Power (corner) button for 5 seconds. 
  • Without releasing the Power button, also hold down the Home (bottom center) button for 10 seconds.
  • Without releasing the home button, release the Power button. But keep holding the Home button for 15 seconds.
  • When you click on the next button RedSn0w 0.9.13dev2 will begin to jailbreak your iPhone. Let the process be completed do not interrupt it when over your iPhone will boot up with the Apple logo and does not go further this is because you have a tethered Jailbreak. So now follow the steps below to boot your to boot your iPhone in full functional and jailbroken state.
Instructions to tethered boot:
  • To boot your iPhone in full functional and jailbroken state or say to tethered boot your device on iOS 6.0 Beta 2, Connect your jailbroken iPhone to the computer, Relaunch RedSn0w and choose Extras on the next screen select "Just Boot". This means every time your tethered Jailbreak iphone looses power you will have to connect it to computer to tethered boot with the help of RedSn0w.
Congratulation! now you are on jailbroken iOS 6.0 beta 2 a step ahead.
Read more ...